Whirlpool gas range repair across Staten Island NY — Premier Appliance Repair Staten Island

Whirlpool Oven Not Heating?
Same-day repair · Staten Island

Oven won't heat · Won't turn on · Igniter glows but no flame · Slow to preheat · Burner clicks but won't light · F-codes on display — same-day Whirlpool gas and electric range repair across all 10 Staten Island ZIPs

Available Today · 5 appointments across Staten Island
📅 Book a Same-Day Visit 📞 Call (929) 261-4444

$80 diagnostic · Exact repair price after diagnosis · 90-day warranty

5.0 Google 88+ verified reviews
Licensed & Insured 4+ years experience
90-Day Warranty Parts & labor
Same-Day Service 7 Days a Week

GET A CALLBACK

Tell us what's wrong —
same-day callback

Describe the symptom — Badma will call to confirm the likely fix and same-day availability anywhere in Staten Island.

★★★★★ 88+ Staten Island homeowners trust us on Google
✅ Got it! Badma will call you back today.
⚠️ Something went wrong. Please call (929) 261-4444.
5.0 Google rating across 88+ reviews
$80 Flat diagnostic — applied toward your repair
90d Warranty on every completed repair — parts & labor
10 ZIPs Full Staten Island coverage — North Shore to South Shore

Whirlpool Oven Repair — Staten Island

Whirlpool Oven Won't Heat or Won't Turn On? The Igniter Is Almost Always Why.

📍 All Staten Island · 10301–10314

Three calls dominate every week of Whirlpool oven service across Staten Island. "My Whirlpool oven won't heat." "My Whirlpool oven won't turn on." "The igniter glows but the burner won't light." From the pre-war blocks of Silver Lake and Port Richmond, through the postwar Cape Cods of New Dorp and Great Kills, down to the South Shore subdivisions of Eltingville and Charleston — Whirlpool gas ranges are everywhere. Founded in Benton Harbor, Michigan in 1911, Whirlpool built its reputation on appliances that run for a decade or more without complaint, and that reputation is well-earned. The flip side of that durability is that when a Whirlpool oven finally does fail, the cause is almost always one of a small set of predictable, age-related parts. The single most common is the bake igniter.

The Whirlpool ovens we work on are family appliances in the truest sense. They roast Sunday dinners in three-generation households on Hylan Boulevard, bake birthday cakes in young-family kitchens off Forest Avenue, and reheat takeout for solo retirees in two-bedroom co-ops near St. George. Many of the Whirlpool ranges Badma services were bought 8, 10, even 14 years ago — long enough that they were the oven the kids learned to bake in, and long enough that when something finally goes wrong the homeowner's first instinct is to fix it rather than replace it. That instinct is usually right. A working-condition Whirlpool gas range that has had its igniter and sensor refreshed will keep performing reliably for several more years; the underlying chassis, gas valve, burner tube, and cavity insulation are built to outlast a single cycle of consumable parts. What we replace, almost without exception, is the small handful of components that wear: the igniter, the sensor, the gasket, occasionally the door lock, and on Smart units sometimes the touch board.

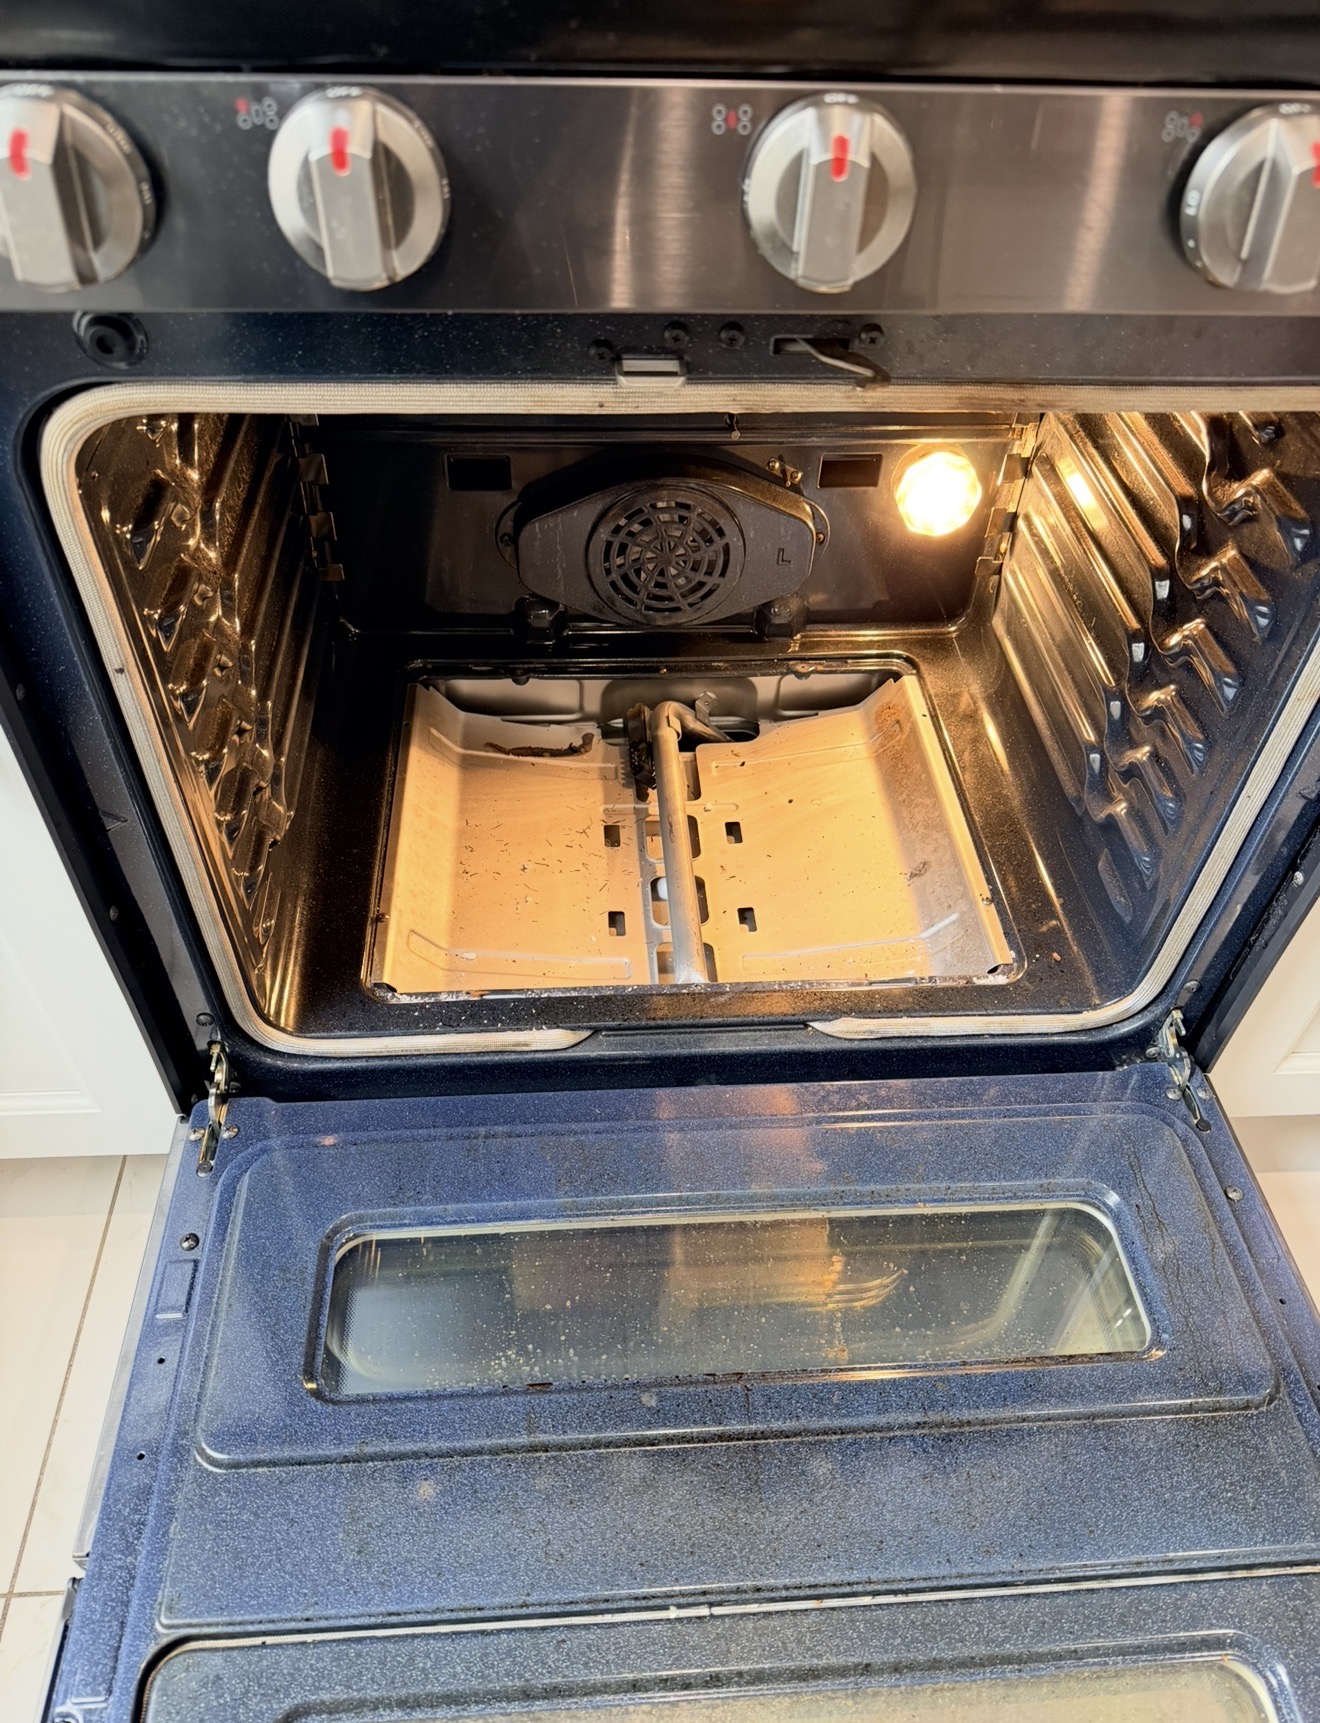
The Whirlpool oven igniter is a flat ceramic component that sits at the bottom of the oven cavity, partially shielded by a metal cover. It does two jobs simultaneously, and understanding both is the key to understanding nearly every "won't heat" complaint we see. First, it heats up to the white-hot temperature needed to ignite the gas as it leaves the burner tube. Second — and this is the part most homeowners and even some technicians miss — it acts as a current sensor. The Whirlpool gas safety valve will not release gas to the burner until the igniter draws enough electrical current to confirm it is hot enough to ignite that gas. As the igniter ages, the resistance gradually climbs, current draw drops, and the gas valve never gets the threshold signal to open. The result is the classic Whirlpool failure mode: glow but no flame.

Safety first — gas smell is not a DIY situation. If you smell gas (and not just a brief whiff when a burner first lights), turn off the range, open windows, do not flip light switches, and call National Grid at 1-718-643-4050. They respond 24/7 free of charge and will shut off the supply if there's a leak. Only after the gas situation is safe, call us at (929) 261-4444 to repair the range.

The Whirlpool Igniter Decay Curve — Why "Won't Heat" Has Five Different Names

What makes the Whirlpool igniter so important to understand is that it doesn't fail all at once. It decays gradually over its 6 to 10 year life, and at each stage of decay it produces a different symptom that homeowners describe with different language. The same physical cause shows up under five different search queries:

Stage one (years 6 to 8): slow ignition. The igniter still glows on the same schedule it always did, but the burner takes longer than usual to actually light — sometimes well past the 90-second mark. Homeowners describe this as "Whirlpool oven slow to preheat" or "takes forever to heat up." The igniter still works. It is just signaling, in the only way it can, that its current draw is starting to drop.

Stage two (years 8 to 9): inconsistent ignition. Some bake cycles light normally; some take three or four minutes; some fail entirely on the first attempt and only ignite after the cycle is restarted. Homeowners call this "Whirlpool oven sometimes works sometimes doesn't" or "intermittent oven not heating".

Stage three (around year 9): glow without flame. The igniter glows visibly when you watch through the oven window, but the burner never lights and no gas reaches the cavity. The igniter is no longer reaching the white-hot intensity needed to draw the threshold current the safety valve requires, so the valve stays closed. This is the call most homeowners finally make — and the symptom typed into search as "Whirlpool igniter glows but no flame" or "Whirlpool oven not heating up but burners work."

Stage four (terminal): no glow at all. The igniter has cracked or fully open-circuited. Nothing happens when bake is selected. The display shows the set temperature but the oven stays cold. Homeowners describe this as "Whirlpool oven won't heat up at all" or "oven completely dead".

Stage five (rare but real): control board confusion. A failed igniter that has shorted internally instead of open-circuiting can confuse the control board and produce a code like F1-E0 or F1-E1, leading homeowners to chase a board fault that is actually downstream of an igniter problem. Replacing the igniter clears the code.

Every one of these symptoms — slow preheat, inconsistent ignition, glow without flame, no glow at all, even some F-codes — traces back to the same physical part. In practice, real igniter decay rarely follows the curve this neatly. A unit can jump straight from healthy to no-glow if hit by a power surge or a hairline crack from thermal shock; some igniters skip the inconsistent-ignition stage entirely and go straight from slow to glow-without-flame; many homeowners only notice anything is wrong once Stage 3 or 4 hits and dinner is at stake. The five-stage framing matters because each stage maps to a distinct way people describe the same underlying problem when they search for help. The right fix is the same regardless of which stage you noticed first: replace the igniter at the first reliable sign of decay rather than wait for the oven to go fully dark.

Whirlpool Oven Won't Turn On — A Different Problem Entirely

The phrase "won't turn on" gets used loosely, but the right diagnosis depends on whether the display is dark or lit. If the oven display lights up normally but the oven won't reach temperature, that is "won't heat" — see the igniter decay sequence above. If the display itself is completely dark, no lights, no beep when buttons are pressed, no clock — that is a power problem and the igniter has nothing to do with it. Three checks before calling: cycle the breaker labeled Range or Oven for at least 30 seconds, then for a longer reset try 5 to 10 minutes off; verify the wall outlet behind the range is still gripping the plug (years of vibration loosen receptacles); and confirm no GFCI breaker upstream of the range outlet has tripped. If the display stays dark after a full power cycle, the failure is upstream — the touch control board, the oven relay control board, the ribbon cable connecting the two, or in rare cases an internal power supply has failed. Same-day diagnosis available across Staten Island.

The Igniter Test Anyone Can Run in Five Minutes

Before calling for service, try this. Set the oven to Bake 350°F and turn on the oven light. Open the oven door briefly to confirm the cavity is empty (no pans on the bottom that could shield the igniter from view), then close the door. Sit down with a phone timer and watch through the window. Within roughly 30 to 60 seconds you should see a bright glow at the bottom of the oven — that's the igniter ramping up from red through orange toward white-hot. By around the one-minute mark, and certainly by 90 seconds total from the moment you pressed Start, you should hear the gas valve open and see a steady blue flame across the burner tube. The single clearest diagnostic is timing, not color: if 90 seconds pass with the igniter glowing but no flame appears, industry guidance is consistent — the igniter is too weak to draw the current the safety valve needs, and replacement is the fix. Checkpoints to note: glow within 30 seconds (igniter is healthy), glow appearing 45 to 60 seconds in (igniter is showing age), no glow at all by 60 seconds (igniter is dead or the wiring is broken), glow but no flame at 90 seconds (classic weak-igniter failure). Tell Badma exactly what you observed during the test when you call — it lets him bring the right igniter (W10918546 for most Whirlpool gas ranges, W11208965 for the newer WFG320/WFG505 series) on the first visit.

The Sensor and the Gasket — Two Other Causes of Slow Heat

Not every slow-preheat call traces back to the igniter. Two other components produce overlapping symptoms and need to be ruled out before assuming igniter replacement. The first is the oven temperature sensor (WPW10181986 on most current Whirlpool, KitchenAid, and Maytag units that share the platform). The sensor is a small RTD probe that mounts on the back wall of the oven cavity and tells the control board what the actual oven temperature is. Whirlpool's AccuBake system claims ±2°F accuracy when new, but the sensor drifts measurably after 5 to 7 years of use. A drifting sensor reads higher than actual temperature, the control board shuts off heat early on a false reading, and the oven runs colder than the display says. The classic test is a $6 oven thermometer from any hardware store: set the oven to 350°F, wait 20 minutes, and compare. Off by more than 35°F means the sensor has drifted out of calibration and replacement is the fix. Off by 50°F or more means the sensor may be reading wildly out of range and Whirlpool's safety logic may eventually throw F3-E0 (open circuit) or F3-E1 (shorted circuit) codes.

The second is the door gasket (W11542153). The gasket is a continuous loop of woven fiber around the perimeter of the oven opening, and it does the work of sealing 350°F of oven heat against a 70°F kitchen. After 8 to 10 years of compression, the gasket flattens, develops corner gaps, or pulls loose at one of its anchor points. Heat escapes during preheat, the oven works longer to reach setpoint, and you get the same "slow to preheat" symptom that a weak igniter would produce. Inspect the gasket monthly: open the door, run a finger around the perimeter, and look for tears, flat spots, or visible gaps where light shines through when the door is closed. Gasket replacement is straightforward and same-visit. Badma checks gasket, sensor, and igniter together on every preheat-time complaint to identify which is the actual cause — sometimes more than one is contributing.

Self-Clean: AquaLift vs. Pyrolytic — Why It Matters for Diagnosis

If your Whirlpool oven failed shortly after a self-clean cycle, the type of self-clean matters for diagnosis. Older Whirlpool ovens — built before roughly 2014 on most lines — use traditional pyrolytic self-clean, which heats the cavity to roughly 800°F for two and a half to four hours to incinerate residue. That heat stresses every component nearby: the temperature sensor, the bake element on electric models (W10779716), the door lock motor (WPW10107820), the convection element on convection models, and the control board itself. Post-self-clean failures are common on pyrolytic-equipped Whirlpools, and industry repair guidance has long identified the proximity of front-mounted control panels to that high-temperature cycle as a known stressor. If the oven worked yesterday, you ran self-clean overnight, and now the bake element is dark or the display shows F3-E0, the self-clean cycle is almost certainly the trigger.

Newer Whirlpool ovens use AquaLift — a low-temperature, water-assisted clean cycle that runs at about 200°F for roughly 40 minutes. You pour 1¾ cups of distilled water (gas) or 2 cups (electric) onto the oven floor, press the AquaLift Self Clean button, and the cycle uses heated steam against a special porcelain coating to loosen residue. AquaLift is markedly gentler on electronics — the post-clean component failures we see on pyrolytic units rarely happen on AquaLift-equipped models. The honest tradeoff: many Whirlpool, KitchenAid, Maytag, and JennAir owners find AquaLift requires multiple cycles plus manual wiping to handle heavy baked-on soil, and the gap between marketing and real cleaning performance has been the subject of consumer complaints. If your Whirlpool was built after 2014 and you don't see a self-clean cycle that warns about extreme heat, you likely have AquaLift — and a post-clean failure on that platform usually points back to the igniter, sensor, or board components that fail through normal wear, not the cycle itself.

Whirlpool Smart Ovens — What Changes

Whirlpool's Smart Oven line — the Wi-Fi-enabled wall oven, slide-in gas, and select mid-tier WFE and WEE electric range models — adds connectivity, app integration, and a touch display board. When something stops working on a Smart oven, the diagnosis splits into two questions: did the heating system fail, or did the smart system fail? A Smart oven that won't heat almost always has the same cause as any other Whirlpool — the igniter, the sensor, the bake element, the gas valve. The Wi-Fi has nothing to do with it. But a Smart oven that heats fine but won't respond to the Whirlpool app, or shows F1-E0 EEPROM communication codes intermittently, has an issue in the smart-control side that requires the touch control board or its companion display board. We diagnose both sides on Smart oven calls — the heating side first because that's what stops you from cooking dinner, the smart side second because connectivity issues are inconvenient but not blocking.

On a related note, KitchenAid is Whirlpool's premium sister brand, and many KitchenAid ovens (including the KFGG500ESS, KFGS500ESS, KSGB900ESS, KFEG500ESS, and KFEG510ESS) share the same Whirlpool platform underneath the higher-end metal trim and dual-fan convection. Most Whirlpool repair parts — igniters, sensors, gaskets, hinges, lock motors — are interchangeable between Whirlpool, KitchenAid, Maytag, and Amana branded units that came off the same Benton Harbor platforms. That cross-compatibility is one of the reasons Whirlpool repairs tend to go faster than other brands: the parts are widely stocked and the supply chain is deep. Badma carries the most common Whirlpool oven parts on the truck for same-visit repair across all four sister brands.

Why Choose Premier

Premier vs. Whirlpool Service Center

Factor 🏢 Whirlpool Service 🔧 Premier Appliance
Arrival on Staten Island ❌ 5–14 day wait ✅ Same-day
Free phone advice before a visit ❌ Queue & script ✓ Always
Diagnostic fee ❌ $100–150+ ✅ $80, applied
Igniter on truck for same-day fix ❌ Often back-ordered ✅ W10918546 + W11208965 stocked
Sensor and gasket on truck ❌ Order & second visit ✅ WPW10181986 + W11542153 stocked
Service KitchenAid / Maytag / Amana too ❌ Brand-by-brand call ✅ Same platform, same visit
Price quoted before work starts ❌ Not always ✅ Always in writing
Warranty ❌ Varies ✅ 90-day guarantee
Weekend availability ❌ Weekdays only ✅ Mon–Sun

Honest, Transparent Pricing

What a Visit Costs

$0
Hidden Fees
No weekend charge. No trip fee. No fuel surcharge. No North Shore vs South Shore zone pricing. Price quoted before work starts and locked in.
How the repair price is determined: After diagnosis, Badma gives you the exact price in writing. It depends on which part failed and your Whirlpool model — a bake igniter, a temperature sensor, a gas valve solenoid, a bake or broil element, a door lock motor, and a touch control board are all different repairs at different prices. We don't guess over the phone because two ovens with the same symptom can need different parts. You approve the price before any work starts. Every completed repair carries a 90-day parts and labor warranty.

Prices subject to NY state sales tax (8.875%).

Book Your Visit

Whirlpool Oven Won't Heat or Won't Turn On Anywhere in Staten Island?

Same-day diagnosis — $80 flat, exact repair price after we see the problem. Badma covers all 10 Staten Island ZIPs from Silver Lake to Tottenville.

📅 Book Online Now 📞 (929) 261-4444

Whirlpool Gas & Electric Range Error Codes

What Your Display Is Telling You — and What to Try First

F3-E0 Oven Temperature Sensor — Open Circuit

F3-E0 is the most common Whirlpool oven sensor fault and one of the most frequent reasons a Whirlpool oven stops heating. The control board has detected an open circuit on the temperature sensor (RTD) wiring. Either the sensor itself has failed, the wire harness has come loose, or a wire has chafed through against the cavity wall. The control shuts off all heat to prevent unsafe operation.

  1. Power cycle at the breaker for a full 5 to 10 minutes — clears soft glitches that occasionally throw F3-E0 falsely.
  2. After power returns, set Bake 350°F and watch for the code to reappear.
  3. If F3-E0 returns within the first minute of bake, the sensor or its wiring has hard-failed and needs replacement.
  4. If F3-E0 cleared and doesn't come back during a full bake cycle, the issue was a temporary glitch — monitor for a few days.

The Whirlpool oven temperature sensor is WPW10181986 on most current WFG, WFE, WEG, and WEE models, and on most KitchenAid units that share the platform. Mounted on the back wall of the oven cavity. Same-visit replacement. Call (929) 261-4444 →

F3-E1 Oven Temperature Sensor — Shorted

F3-E1 is the same sensor circuit, opposite failure mode: the sensor or its wiring has shorted to ground or to itself. The control board now reads an impossible temperature value and shuts off heat. Common causes: the sensor probe element has cracked internally, a wire has been pinched against a metal edge during a previous service, or moisture from a self-clean cycle has bridged the connector pins.

  1. Power cycle at the breaker for 5 to 10 minutes.
  2. If F3-E1 cleared, run a normal bake cycle and watch for it to return — sometimes humidity-related shorts dry out and clear permanently.
  3. If F3-E1 returns, the fix is the same sensor (WPW10181986) — it doesn't matter whether the failure mode was open or shorted, the part is replaced as a unit.

Badma diagnoses sensor faults same-visit across Staten Island. Call (929) 261-4444 →

F2 Oven Temperature Too High — Safety Cutoff

This is a safety code, not a sensor fault. A bare F2 code (without an E suffix) means the oven temperature climbed beyond the safe upper limit and the control's runaway protection has activated. Stop using the oven immediately and turn off the breaker until it can be inspected. Industry repair guidance points to checking for welded contacts on the bake and broil relays first; if any are welded, the oven control board has to be replaced. Less common causes include a temperature sensor failure that fed a misleadingly low reading while the oven actually overheated.

  1. Turn off the Range breaker right away. Do not try to reset by power-cycling and continuing to use the oven — runaway protection exists for a reason.
  2. Allow the oven to cool fully — at least 2 hours.
  3. Call us. The fix is usually the oven control board, with confirmation testing of the temperature sensor.

This is one repair where same-day matters for safety. The oven temperature sensor (WPW10181986) and oven control board are both diagnosed on-site. Call (929) 261-4444 →

F1-E0 / F1-E1 Control Board Communication or EEPROM Fault

F1-E0 indicates an EEPROM communication failure — the control board cannot read its calibration memory. F1-E1 indicates a broader control or main relay board failure. Both often appear after a power surge or a brownout, and both are sometimes recoverable with a long power cycle.

  1. Power cycle at the breaker for a full 10 minutes — these codes respond well to a long power cycle.
  2. After power returns, wait 2 minutes before using the oven so the boards finish their boot sequence.
  3. If F1-E0 or F1-E1 clears and stays clear, the surge was the cause and you're done.
  4. If the code returns within hours or days, the EEPROM has corrupted or the control board has hard-failed.

Replacement is the touch control board or oven relay control, depending on which board is reporting the fault. Badma diagnoses on-site. Call (929) 261-4444 →

F2-E0 / F2-E1 Touch Keypad — Stuck Button or Disconnect

F2-E0 means the control is reading a button as continuously pressed when nothing is being pressed — almost always caused by food splatter, grease film, or moisture on the touch panel. F2-E1 means the touch panel has lost its connection to the control board entirely.

  1. Wipe the touch panel with a damp microfiber cloth — never spray cleaner directly onto it. Clean gently around every button area.
  2. Check the panel in good light for any button that looks physically depressed, chipped, or cracked.
  3. Power cycle at the breaker for 5 to 10 minutes.
  4. Try a cycle. If F2-E0 clears and stays clear, you're done.

If the code returns after cleaning and a power cycle, the touch panel membrane or its ribbon cable to the control board has failed. Whirlpool touch panels are generally more reliable than the equivalent Samsung panels, but they're not immune. Call (929) 261-4444 →

F5-E0 / F5-E1 / F5-E2 Door Switch or Door Lock Faults

The F5 family covers the door circuit. F5-E0 means the door switch has failed or its wiring has broken — the control can't tell whether the door is open or closed. F5-E1 means a self-clean cycle was initiated but the control didn't see the door reach fully closed before locking. F5-E2 means the door lock motor failed to engage during a self-clean attempt.

  1. Open and close the door firmly — sometimes a stiff hinge or a slightly out-of-line latch keeps the switch from registering closed.
  2. Check the perimeter gasket (W11542153) for compression that might be holding the door slightly open.
  3. Power cycle at the breaker for 5 minutes.
  4. If you were running self-clean when F5-E1 or F5-E2 appeared, do not try again until the issue is fixed — repeated self-clean attempts with a failed lock can damage the latch assembly.

The fix is usually the door lock motor (WPW10107820) or the door switch assembly. Same-visit replacement. Call (929) 261-4444 →

F4-E1 Meat Probe Defect or Probe Circuit Issue

F4-E1 indicates a problem with the meat probe, the probe receptacle in the oven cavity, or the probe circuit on the control board. Industry repair guidance recommends inspecting the probe for pinched wires and confirming there is no condensation or food residue contamination on the receptacle pins. Sometimes the probe itself has failed; sometimes the receptacle inside the oven is the issue.

  1. Remove the probe and inspect the cable for pinch damage, cuts, or melted insulation.
  2. Inspect the receptacle in the oven cavity for grease, baked-on residue, or moisture across the contact pins. A cotton swab with a little rubbing alcohol cleans them safely once the oven is cool.
  3. Reinsert the probe firmly and re-test. If F4-E1 persists, the probe assembly itself has failed.
  4. If the F4-E1 throws even with the probe disconnected and removed from the cavity, the receptacle wiring or control input has failed.

Probe replacement is straightforward and same-visit. Receptacle wiring repairs may require accessing the back of the cavity. Call (929) 261-4444 →

F9 / F9-E0 Electrical Issue — Miswired Outlet or Connection

F9 (and the related F9-E0) is one of the most misunderstood Whirlpool oven codes. It is not a door lock fault — that's the F5 family. F9 indicates an electrical wiring issue: the oven's outlet is miswired, the connection to the appliance is wrong, or there is a neutral / ground problem on the line. The code shows up most often after a recent installation, after a service tech has worked on the outlet, or after a renovation that touched the kitchen wiring.

  1. Press Cancel or Off and observe whether the code clears. F9 sometimes clears on its own once the offending condition is gone.
  2. Power cycle at the breaker for 5 minutes to rule out a transient surge.
  3. If F9 returns, do not run the oven. The fix is electrical and needs a licensed electrician to inspect the receptacle wiring (especially the neutral), the breaker, and the connection from the breaker panel to the kitchen outlet.

Note: Pressing any oven button within 10 seconds of restoring power after an outage can also momentarily trigger F9 — wait the full 10 seconds after a breaker reset before pressing anything. We coordinate with electricians on F9 calls; the appliance side of the diagnosis is included in the standard $80 service call. Call (929) 261-4444 →

PF / Sab Power Failure Recovery / Sabbath Mode (Not Errors)

Two displays that cause panic but aren't actually faults. PF means Power Failure recovery — the oven detected a brief power interruption and is reminding you to reset the clock. Just press Cancel and reset the time. Sab or "Sabbath" means Sabbath mode is active. The oven will not display temperature changes or beep during cycles — designed for observance of the Jewish Sabbath but commonly activated accidentally during cleaning or by curious children pressing buttons. To exit, hold the Sabbath button for several seconds (the exact button varies by model — check the user manual). Sabbath mode disables many normal functions, so an oven stuck in Sabbath looks broken even when nothing is wrong.

If you've cleared PF and the clock won't reset, or you can't find the Sabbath button to exit, call us. Call (929) 261-4444 →

No Code Burner Clicks but Won't Light — No Error Displayed

Whirlpool gas ranges don't usually throw a code for a single cooktop burner problem — the click-but-no-light issue shows up without any display warning. This is the most common Whirlpool gas range cooktop problem and often a DIY fix.

  1. Turn off the range. Wait for the burner to cool completely.
  2. Lift off the grate, the burner cap (round flat piece on top), and the burner head (metal ring with small holes around its edge).
  3. Clean the small holes around the burner head with a pin or toothpick — food debris and grease block gas flow.
  4. Wash with warm soapy water, rinse, and dry completely. Wet components will not ignite.
  5. Make sure the burner cap sits flat and centered, not tilted on the head.
  6. Turn the knob to LITE and listen — you should hear rapid clicking and see a spark at the electrode (small ceramic piece beside the burner).

If the burner still clicks without lighting after cleaning, the spark electrode, the spark module, or the gas valve solenoid (98014893) needs service. Call (929) 261-4444 →

Common Whirlpool Oven Problems — Search-Indexed Solutions

Why Won't My Whirlpool Oven Heat? Common Issues We Fix

Whirlpool oven won't heat — burners work, oven stays cold

The most common Whirlpool gas oven complaint. In 8 out of 10 cases on units 6+ years old, it's a weakening bake igniter that has lost current-pulling capacity. The cooktop has its own ignition system (spark electrodes), so cooktop burners working while the oven stays cold is consistent with this exact diagnosis.

  1. Set Bake 350°F. Turn on the oven light. Watch through the window for 90 seconds.
  2. Glow appears within 30 to 60 seconds, then blue flame within 90 seconds total = healthy.
  3. Glow appears but never produces a flame = weak igniter (most common). Replacement: W10918546 on the majority of Whirlpool gas ranges, W11208965 on newer WFG320/WFG505 series.
  4. No glow at all = dead igniter, broken wire harness, or control board relay fault. Same-visit diagnosis.

Badma carries all three current igniter generations on the truck for first-visit replacement. Call (929) 261-4444 →

Whirlpool oven won't turn on at all — display is dark

This is the power problem, not the heat problem. If the display is completely dark — no clock, no lights, no beeps when buttons are pressed — the oven is not receiving the 120V control voltage it needs. Even gas ovens require electricity for the controls and igniter circuit.

  1. Find the breaker labeled Range or Oven. Flip it OFF for 30 seconds, then back ON.
  2. If the display is still dark, try a longer reset: breaker OFF for 5 to 10 minutes, then ON.
  3. Check the wall outlet behind the range — the plug can vibrate loose over years.
  4. Check upstream GFCI breakers in the kitchen circuit — sometimes a tripped GFCI on a neighboring outlet kills the range circuit too.

If the display stays dark after a full reset, the touch control board, the oven relay control, or the ribbon cable between them has failed. Call (929) 261-4444 →

Whirlpool oven igniter glows but no flame appears

The signature Whirlpool failure on units 6 to 10 years old. The igniter still glows orange when watched through the window, but the burner never lights. Cause: the igniter's resistance has climbed with age, current draw has dropped below the gas safety valve's threshold, and the valve refuses to open. The fix is the igniter, not the gas valve.

  1. Confirm the symptom: set Bake 350°F, watch through the window for the igniter to glow at the bottom within 30 to 60 seconds, then watch for blue flame across the burner tube within 90 seconds total.
  2. Glow visible, no flame at the 90-second mark = weak igniter. The gas valve is doing exactly what it's designed to do (refuse to open without enough current draw to confirm the igniter is hot enough).
  3. Tell Badma which Whirlpool model you have when you call so he brings the right igniter generation: W10918546 (most WFG/WEG units) or W11208965 (newer WFG320/WFG505 series).

Multimeter test for technicians: a working Whirlpool hot surface igniter typically draws between 2.5 and 3.6 amps and reads roughly 80 to 175 ohms across the terminals. Below approximately 2.7 amps, the gas safety valve will not open even though the igniter visibly glows. Call (929) 261-4444 →

Whirlpool oven slow to preheat or takes forever to heat up

Three common causes on Whirlpool ovens, often overlapping:

  1. Weak igniter approaching end of life — even when it eventually lights the burner, a weak igniter cycles the gas valve open inefficiently and adds 5 to 10 minutes to preheat.
  2. Worn door gasket (W11542153) — heat escapes during preheat, the oven works longer to reach setpoint.
  3. Drifting temperature sensor (WPW10181986) — the oven shuts off heat early on a false reading. Use a $6 oven thermometer to verify actual versus displayed temperature. Off by 35°F+ means sensor replacement.

Badma tests sensor, igniter, and gasket together on every preheat-time complaint. Often more than one is contributing. Call (929) 261-4444 →

Whirlpool oven shuts off mid-cycle — won't stay on

Whirlpool ovens have several safety triggers that shut off mid-cycle. The most common causes:

  1. Door not fully closed — an oven rack pushed too far back or a pan handle catching the door leaves a gap that the door switch reads as "open" and shuts off the cycle.
  2. Failed door switch — the switch reports "door open" even when the door is fully closed.
  3. Worn gasket allowing heat to escape — the safety thermostat in the back wall reads runaway external heat and triggers shutdown.
  4. Intermittent communication faults between the touch board and oven control that trigger a precautionary shutdown — sometimes appearing as transient F-codes that clear before they can be read.

Check door alignment and gasket compression first. If the door looks fine, the door switch or one of the boards is the cause. Call (929) 261-4444 →

Whirlpool gas burner clicks but won't ignite

This is the cooktop, not the oven. The most common Whirlpool gas range cooktop complaint, and usually a 10-minute DIY fix:

  1. Let the burner cool completely. Turn off the range at the breaker for safety.
  2. Lift off the grate, then the burner cap, then the burner head.
  3. Clean the small holes around the burner head with a pin or toothpick — trapped food and grease block gas flow.
  4. Wash with warm soapy water. Rinse. Dry completely — wet components will not ignite.
  5. Reassemble — the cap must sit flat and centered.
  6. Turn the knob to LITE — you should hear fast clicking and see a small blue spark at the electrode.

If the burner still clicks without lighting after cleaning, the spark electrode (cracked with age), spark module, or gas valve solenoid (98014893) needs service. Call (929) 261-4444 →

Multiple burners click at once — or click when stove is off

If turning one knob makes all burners click, or burners click on their own when no knob is turned, you have one of two issues:

  1. Moisture trapped under the cooktop — common after cleaning, boilovers, or humid weather (especially in coastal Staten Island ZIPs like 10305 and 10307). Turn off at the breaker, open windows, let it air-dry for several hours.
  2. Failing spark ignition switch — the switch behind the knob is stuck "on" electrically. Needs replacement.

If continuous clicking returns after everything has fully dried, it's the ignition switch. Call (929) 261-4444 →

I smell gas near the Whirlpool range — what do I do?

This is a safety situation — do not try to DIY it. A brief gas smell when a burner first lights is normal. A persistent gas smell when the range is off is not.

  1. Turn all burner knobs to OFF. Make sure nothing is cooking.
  2. Open windows and doors for ventilation.
  3. Do not flip light switches, use lighters, or plug or unplug anything — a single spark can ignite gas.
  4. Leave the house if the smell is strong.
  5. Call National Grid gas emergency at 1-718-643-4050 — 24/7, free service. They come out and shut off the supply if there's a leak.
  6. After National Grid clears the scene and it's safe, call us at (929) 261-4444 to repair the range.

We don't service live gas leaks — that's utility work. Once the gas is off and safe, we repair the range part that caused it. Call after the gas situation is safe →

Whirlpool electric oven won't heat (WFE / WEE — bake element)

If you have a Whirlpool electric range (WFE320, WFE505, WFE525, WFE745, WEE515, WEE745, WEE750 series rather than gas WFG/WEG), the diagnosis is different — there's no igniter. The bake element is the failure point.

  1. Set the oven to Broil for 60 seconds. The top element should glow bright orange. Cancel.
  2. Set the oven to Bake 350°F and wait 10 minutes. The bottom element should glow orange.
  3. If broil works but bake doesn't, the bake element (W10779716) has failed. Look through the window — you may see a burn spot, blister, or visible break in the element. Most common trigger: damage during a previous self-clean cycle on older pyrolytic-equipped units.
  4. If neither element heats, the issue is upstream: the thermal fuse (WP9759242), the relay control board, or a half-tripped 240V breaker.

Tell Badma the broil-vs-bake test result when you call so he brings the right element on the first visit. Call (929) 261-4444 →

Convection fan noisy or not running — TimeSavor convection

On Whirlpool ovens equipped with TimeSavor convection (WFG775, WFG975, WEE745, WEE750, and most WOSA2 wall ovens), the convection fan motor bearings wear after 7 to 10 years of use. Symptoms in order of severity:

  1. Mild whirring or grinding noise from the back of the oven during convection cycles.
  2. Loud humming or scraping that gets worse over weeks.
  3. Fan stops running entirely, sometimes paired with an F-code, sometimes silent.
  4. Convection results become uneven — food browns more on one side because the fan is spinning slowly or stalling.

The fix is the convection fan motor. Catch it during the noise stage to avoid a stuck fan that takes the heat circulation system offline mid-cooking. Call (929) 261-4444 →

Your Technician

About Badma

Badma — owner and technician, Premier Appliance Repair Staten Island LLC
Badma Owner & Technician · Premier Appliance Repair Staten Island LLC

The Repair Process

How a Whirlpool Oven Repair Visit Works

1

Call or Book — Share Your Model and Symptom

Call (929) 261-4444 or book online. Have two things ready: the model number from the label inside the door frame (it starts with WFG, WEG, WFE, WEE, WOS, WOD, KFGG, KFEG, or similar — write down the full string with all suffix characters), and what you're actually seeing — the F-code on display, whether the igniter glows, whether the burner clicks, whether self-clean was running when it failed. The model number tells Badma which igniter to load (W10918546 for most units, W11208965 for the newer WFG320/WFG505 series). Some issues — Sabbath mode stuck on, PF after a brief outage, F9 from a recent install with miswired outlet — get solved over the phone in 5 minutes at no cost.

📅 7 Days a Week
2

On-Site Diagnosis — $80 Flat

Badma arrives, inspects the range, and runs the test sequence specific to what you described. For "won't heat" — the igniter timing test through the oven window, then a multimeter check of igniter current draw (a healthy hot surface igniter pulls 2.5 to 3.6 amps; below approximately 2.7 amps the gas safety valve will not open). For F3 codes — sensor resistance verified against spec at room temperature. For self-clean problems — door lock motor function and switch continuity. For F9 — a quick check of outlet wiring with the appliance side ruled in or out. The $80 covers the visit and full inspection regardless of how long it takes.

3

Written Quote — Exact Price Before Any Work

You get the exact repair price in writing — the specific Whirlpool OEM part, its cost, and the labor. If you approve, the $80 diagnostic applies toward the total. If you decide to wait or get a second opinion, you pay only the $80 and Badma leaves. No pressure, no upsell, no "while we're in here" add-ons. Whirlpool igniters and sensors are mid-priced repairs in the Staten Island appliance market; control boards and Smart oven display assemblies sit higher.

4

Repair Done — Same Visit When Part Is On Truck

Most common Whirlpool oven parts ride on the truck for same-visit repair: bake igniters (W10918546, W11208965), oven thermal fuses (WP9759242), temperature sensors (WPW10181986), bake elements (W10779716), door lock motors (WPW10107820), door gaskets (W11542153). Whirlpool's deep parts supply chain is one of the brand's quiet strengths — same-day repair rates on Whirlpool tend to run higher than on brands with thinner inventory channels. Special-order parts — specific Smart-model display boards, certain wall-oven assemblies, niche convection components — are ordered and installed on a second visit, typically 1 to 3 business days. Every completed repair carries a 90-day parts and labor warranty.

🛡️ 90-Day Warranty

Service Coverage

Whirlpool Repair in Every Staten Island ZIP

Same diagnostic price, same warranty, same Badma — across the whole borough. Tap any ZIP for neighborhood-specific information.

10301
Silver Lake
Tompkinsville · Grymes Hill · West Brighton · St. George
10304
Todt Hill
Dongan Hills · Grasmere · Concord
10305
South Beach
Arrochar · Fort Wadsworth · Rosebank
10306
New Dorp
Oakwood · Midland Beach · Bay Terrace
10307
Tottenville
Richmond Valley · Charleston
10308
Great Kills
Bay Terrace · Hopkins corridor
10309
Charleston
Princes Bay · Mt. Loretto
10310
Port Richmond
Mariners Harbor · Elm Park
10312
Eltingville
Annadale · Huguenot · Woodrow
10314
New Springville
Bull's Head · Heartland Village · Travis · Graniteville
📍 North Shore 📍 Mid-Island 📍 South Shore 📍 East Shore 📍 West Shore 🛠 Whirlpool WFG / WEG Gas 🛠 Whirlpool WFE / WEE Electric 🛠 KitchenAid Sister Brand ⚡ Same-Day Service
CUSTOMER REVIEWS

What Staten Island
homeowners say.

★★★★★

Loading live reviews from Google…

PR
Premier Appliance Repair Staten Island
5.0 · Google Reviews
View all reviews on Google

Connect With Us

Find Premier Appliance Repair Staten Island

Frequently Asked Questions

Whirlpool Oven Questions — Staten Island

Why won't my Whirlpool oven heat?

On Whirlpool gas ovens (WFG and WEG series), the most common cause is a weakening bake igniter. The igniter still glows but no longer reaches the white-hot intensity needed to draw enough current to open the gas safety valve, so no gas reaches the burner. Test: set Bake 350°F and watch through the oven window. Within roughly 30 to 60 seconds you should see a bright glow at the bottom of the oven (the igniter ramping from red through orange toward white-hot), and the burner should ignite into a steady blue flame within 90 seconds total. Glow but no flame at the 90-second mark means weak igniter and replacement is needed (W10918546 on most current Whirlpool gas ovens, W11208965 on newer WFG320/WFG505 series). No glow at all means dead igniter, broken wire harness, or a control board relay fault. Other quick checks before calling: confirm the door is fully closed, confirm Sabbath mode (Sab on display) isn't active, and reset the Range breaker for 30 seconds. On Whirlpool electric ovens (WFE and WEE series), the bake element (W10779716) most often fails after a self-clean cycle.

Why won't my Whirlpool oven turn on at all?

This is different from "won't heat" — here the controls are dead, the display is blank, and nothing responds. Even Whirlpool gas ovens need 120V electricity for the controls and the igniter circuit. Three steps: 1) Find the breaker labeled Range or Oven and flip it OFF for 30 seconds, then ON. 2) Check the wall outlet behind the range — after years of vibration the plug can work loose. 3) Try a longer power cycle: breaker OFF for 5 to 10 minutes. If the display stays dark after a full reset, the touch control board, the oven relay control, or the ribbon cable between display and main board has failed. Same-day diagnosis available across Staten Island.

The Whirlpool igniter glows orange but the burner won't ignite. What's wrong?

This is the single most common Whirlpool gas oven failure on units 6 to 10 years old, and it almost always means the igniter has lost pulling power. The igniter does two jobs: it glows hot to ignite gas, and it acts as a current sensor that tells the gas safety valve when to open. As the igniter ages, resistance climbs, current drops, and the safety valve never receives the threshold signal — so you see glow but no flame. Replacing the gas safety valve (98014893) is rarely the right fix; replacing the igniter almost always solves it. The current-generation Whirlpool igniter is W10918546, which fits most WFG and WEG gas ranges in current circulation. Newer WFG320 and WFG505 series units use W11208965. Badma carries both generations on the truck.

How long should the Whirlpool oven igniter take to ignite the burner?

Industry repair guidance for Whirlpool ovens is consistent on the timing: a healthy igniter should produce a visible glow at the bottom of the oven within roughly 30 to 60 seconds of selecting Bake, and the burner should ignite into a steady blue flame within 90 seconds total from the moment you press Start. If 90 seconds pass with the igniter glowing but no flame, that is the textbook sign of weak igniter pulling power — the igniter is no longer reaching the white-hot temperature needed to draw enough current to open the gas safety valve. Some homeowners describe this as slow ignition or slow preheat. The igniter has not fully failed yet, but it has crossed the threshold where its current draw is no longer reliable. From this stage, complete failure typically follows within a few weeks to a few months. Replacing the igniter at this point prevents the eventual won't heat call. Whirlpool igniters are typically rated for 6 to 10 years under normal household use.

Why is my Whirlpool oven displaying F3-E0 or F3-E1?

Both codes point to the oven temperature sensor (RTD). F3-E0 means the sensor circuit is open — usually a broken wire, a disconnected harness, or a sensor that has failed open-circuit. F3-E1 means the sensor is shorted — typically a damaged sensor element or pinched wire grounding to the cavity. Either way, the control board can no longer read oven temperature accurately and shuts off heating. The Whirlpool oven temperature sensor is WPW10181986 across most current WFG, WFE, WEG, and WEE models. It also fits many KitchenAid units that share the platform. The sensor mounts on the back wall of the oven cavity and is a same-visit replacement. Industry repair guidance treats every F3-E variant the same way: the sensor is replaced as the unit. If you instead see a bare F2 code, stop using the oven and turn off the breaker — F2 is a separate safety code indicating the oven temperature climbed above the safe limit, most often caused by a welded relay on the control board.

Why does my Whirlpool oven take so long to preheat?

Three common causes on Whirlpool ovens. 1) Weak bake igniter approaching end of life. Even when it eventually lights the burner, a weak igniter cycles the gas valve open inefficiently and slows preheat by 5 to 10 minutes. Most common cause on units 7+ years old. 2) Worn door gasket (W11542153). If the perimeter seal is torn, compressed flat, or pulled loose at a corner, heat escapes during preheat. 3) Drifting temperature sensor (WPW10181986). Whirlpool's AccuBake system claims ±2°F accuracy when new, but the sensor drifts measurably after 5 to 7 years of use. Buy a $6 oven thermometer at any hardware store. Set the oven to 350°F, wait 20 minutes, and compare. More than 35°F off equals sensor replacement.

How much does Whirlpool oven repair cost in Staten Island?

The diagnostic is $80 flat — same price for every Staten Island ZIP, North Shore to South Shore. After diagnosis, the repair price depends on which part failed and your Whirlpool model. We don't quote over the phone because two ovens reporting the same symptom can need different parts: a bake igniter, a temperature sensor, a gas valve solenoid, or a relay control board are all different repairs at different prices. Common repairs (igniters, sensors, door lock motors, gaskets) are mid-range. Touch control boards and Smart-model display boards are higher. You receive the exact price in writing before any work begins. If you approve, the $80 applies toward the total. If you decline, you pay only the $80 and Badma leaves.

I smell gas near my Whirlpool range — what should I do first?

Do NOT try to fix this yourself. Turn the range OFF at all knobs. Open windows for ventilation. Do not flip light switches, do not use lighters, do not plug or unplug anything — a single spark can ignite accumulated gas. Call National Grid's 24-hour gas emergency line at 1-718-643-4050. They respond free of charge anywhere on Staten Island and will shut off the gas supply at the meter if there's a confirmed leak. Only after National Grid clears the situation and the area is safe, call us at (929) 261-4444 to repair the range part that caused the issue — most often a failed gas valve solenoid (98014893). We do not service live gas leaks. That is utility-company work.

What Whirlpool oven models and series do you repair?

All current and recent Whirlpool gas ranges, electric ranges, freestanding ovens, slide-in ranges, and wall ovens. Common gas range models: WFG320M0BS, WFG505M0BS, WFG525S0HS, WFG535S0LS, WEG745H0FS, WEG750H0HZ, WFG775H0HZ, WFG975H0HZ. Electric: WFE320M0JS, WFE505W0JZ, WFE525S0HZ, WFE745H0FS, WEE515S0LS, WEE745H0LZ, WEE750H0HZ. Wall ovens: WOS51EC0HS, WOS51EC0HW (single), WOD51EC0HS, WOD77EC0HS (double), WOSA2EC0HZ (current Smart Oven). We also service KitchenAid sister-brand units (KFGG500ESS, KFGS500ESS, KSGB900ESS, KFEG500ESS, KFEG510ESS) since KitchenAid shares the Whirlpool platform — many parts are interchangeable. Maytag and Amana branded units off the same Benton Harbor platforms are also supported.

How long is the warranty on Whirlpool oven repairs?

Every completed repair carries a 90-day parts and labor warranty. If the same issue returns within 90 days, Badma comes back and fixes it at no additional charge — no second service call, no second parts cost. The warranty is backed directly by Premier Appliance Repair Staten Island LLC — there is no third-party administrator and no paperwork to file. The $80 diagnostic itself is not warranted (it covers the on-site visit), but every repair we perform is. We stand behind Whirlpool igniter replacements, sensor replacements, control board replacements, gasket replacements, and every other repair the same way.

Ready to Fix It

Whirlpool Oven Not Heating, Won't Turn On, or Igniter Glows With No Flame? Run the Test First — Then Call Us

Same-day service across all 10 Staten Island ZIPs. $80 diagnostic, exact repair price after we see the problem, 90-day warranty on every completed repair.

Taking appointments today
📅 Book a Same-Day Visit 📞 Call (929) 261-4444